Monday, January 23, 2012

Sour Cream Coffee Cake

Sour cream coffee cake

My grandma Ruth's recipe box, spent years sitting in my father's attic after it left Ruth's kitchen.  I was up there sorting through forgotten treasures when I found it packed in a box along with some of her old knitting needles and a collection of buttons.  I pried opened the stiff green lid and stared at the contents in awe.  I remember thinking it was better than discovering a cache of jewels.  I took it with me and stored it away for safekeeping.

Last week I had a bad case of the winter blues, and called my sister for counsel.  "Dig deep into that box and make something amazing," she said.  I knew she was right.   Often to cope, it means digging deep.  Seeing the positive again.  Breathing life into the day.  I wonder how Ruth was at that.

Sour cream coffee cake

This story does not end here, with a slice of moist cake and a cozy cup of tea.  Out of six coffee cake recipes, I chose the one that one that sounded the most interesting-- a yeasted coffee cake with butter, sugar and nuts on the bottom.  An hour later, instead of a sugary aroma wafting from my oven, there was smoke.  The butter and sugar melted and dripped through the detachable bottom of the tube pan, making a sticky mess of my oven.  Over the next two days, there were two more coffee cakes and I was scrambling to pull dinner together.  I was thoroughly distracted and feeling much better.

Research

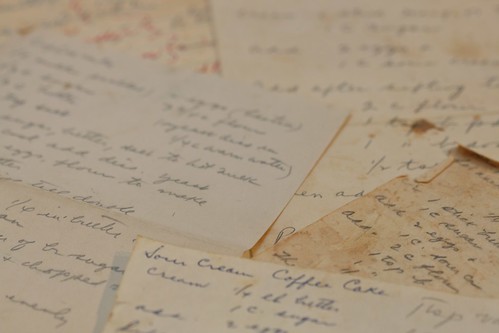
By day three, I was all business.  I spread all six of Ruth's coffee cake recipes out in front of me.  Ruth had obviously tested and retested these.  There were pencil marks, edits and spills.  She must have been pretty serious about her coffee cake.  What had she done with all that cake?

Sour cream coffee cake

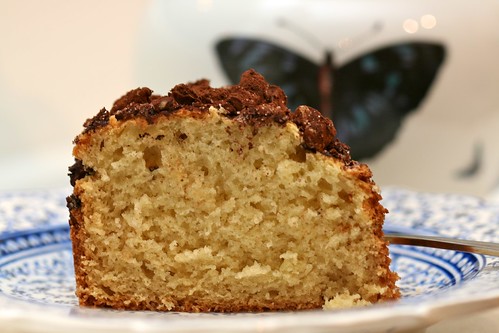
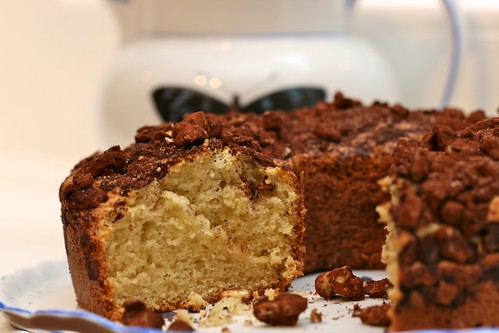
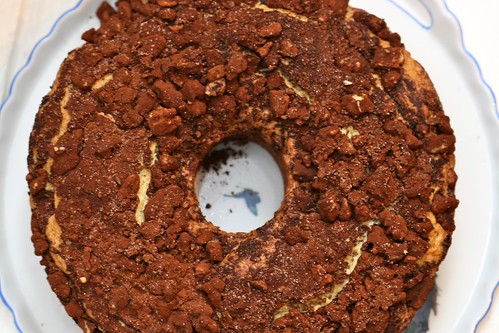
In the end, I settled on Ruth's basics.  Butter, sugar, full-fat sour cream.  Nothing fancy, a simple topping.  The third time was a charm.  By the end of the weekend, my supply of butter, eggs and sugar was gone.  Two sad cakes lay like sunken ships at the bottom of my trash can.  Along with one superb coffee cake, I had honed my homemade coping mechanisms. That's one treasure that didn't come written on a recipe card.

Sour Cream Coffee Cake

1 stick of butter, softened
1 cup sugar
2 large eggs
1 teaspoon vanilla
1 cup sour cream
2 cups flour
1/4 teaspoon salt
1 1/2 teaspoons baking powder
1 teaspoon baking soda

Topping
1/4 cup sugar
2 teaspoons cinnamon
2 tablespoons cocoa
1/2 cup to 1 cup chopped walnuts

With an electric mixer, cream the sugar with the butter.  Add one egg at a time and the vanilla, and mix again.  Stir in the sour cream.  Sift the flour, salt, baking powder and baking soda, then stir that into the wet ingredients.  Butter a tube pan, distribute the batter evenly into the pan and then top with the topping mixture.  Bake at 350 degrees for about 40 minutes or until a tooth pick comes out clean.  Best enjoyed within two days.  

Wednesday, January 18, 2012

Dill Bread and a simple lesson

Dill bread cooling

This morning on the R train uptown, three men in their mid-40's got on and sat down a few seats away from us.  They were recounting something humorous that had transpired between one of them and a manager at work.  They were all laughing so hard they were crying.  Roman was fixated.  He quickly started bellowing with laughter in unison with the three men.  The other train passengers quickly noticed the little two-year old sharing their humor-- quite literally laughing for the sake of laughing.  Soon the whole subway car was observing and I think it's fair to say that he had officially brightened the morning of twenty strangers.  It was priceless.

IMG_8528

Now about this bread.  I clicked the oven light on and crouched down with nervous anticipation in front of the oven window. So far so good. I had been in this same spot on the kitchen floor the previous Sunday with the same two loaves baking, filling my apartment with a warm dilly aroma. My hopes were totally dashed when I took the bread out to cool. Both loaves deflated, and my ego along with them.  We all have kitchen disappointments.   Sometimes there's no good explanation.  Seven days later I rolled up my sleeves and gave it another go and I nailed it the second time. 

Dill Bread

But I was left asking myself, do I really place so much of my sense of self worth in my culinary creations? Now it strikes me that I could be so petty.  I had actually let it ruin a few hours of my day!  I think Roman was trying to teach me something on the train this morning.  Come on, laugh a little.  

Dill bread


Dill Bread
Makes two loaves

As breads go, this is super healthy, using only whole wheat flour and packed full of two cups of cottage cheese.  It's not every day you find both calcium and protein in a bread.  And talk about fragrant.  It's terrific for a savory breakfast with eggs, or toasted for lunch with some fresh tomato and cheese slices.  I hope you'll try your hand at it.  It's not a difficult bread to make.  This was one of my mom's regular breads.  I'm really not sure where the recipe originally came from so I cannot correctly attribute the source.

2 packages dry yeast
1/4 cup warm water
1 teaspoon honey
2 cups large-curd cottage cheese
3 tablespoons honey
6 teaspoons minced fresh onion
4 tablespoons melted butter
2 tablespoons dill weed
3 teaspoons salt
1/2 teaspoon baking soda
2 eggs, unbeaten
4 to 4 1/2 cups whole wheat flour

Dissolve the yeast in the warm water and stir in one teaspoon of honey.  Set aside to proof. 

In a large bowl, combine the cottage cheese, 3 tablespoons honey, onion, butter, dill weed, salt and baking soda.  Add the yeast mixture and stir.  Then add the eggs and stir again. 

Add enough flour to make a stiff dough, stirring well after each addition.  Turn the dough out onto a lightly floured surface and knead for 8 to 10 minutes, until the dough feels smooth and elastic.  If the dough seems too sticky, add more flour.  Place in a greased bowl, turn once more to coat the top, cover with a dish towel and place in a warm spot to rise to double, about one hour.  

Punch down the inflated dough and knead gently for 1 to 2 minutes.  Let rest for a few minutes and then shape into two loaves.  (I follow James Beard's method to shape loaves: pat the dough into a rectangle and then roll it up, pinching the bottom to close, and place bottom side down into the buttered loaf pans.)  Cover and let rise to double in a warm spot, about 45 minutes. 

Bake at 350 degrees for 40-50 minutes or until loaves sound hollow when tapped.  Cool on wire racks. 


Sunday, January 15, 2012

Good Shepherd Cereal

 IMG_8583

I know what they say about American cereal being bad for you, and in many cases it's true.  But in my world, cereal has always been a health food by definition.  And in the beginning, it really was.  "Granula" was first invented in 1894 by a doctor in New York, the name later changed to granola by Kellogg's.  Store-bought granola is expensive and can also be sugary, so I've been making my own for years.  A small bowl of homemade granola with some fruit and yogurt is one of my all-time favorite snacks.

I came across this recipe on a tiny piece of paper folded inside Ruth's box.  I added a few trendy ingredients like chia seeds and flax seeds and substituted my beloved Massachusetts maple syrup for the honey.  I succeeded in eating a batch practically single handedly.  What appeals to me most is the crunch of the buckwheat and the absence of spices.  This actually allows the taste of each ingredient to shine through.

IMG_8595

From a health perspective, I am attracted to foods like chia seeds and buckwheat groats that act like super heroes in my body.  Honestly, I get a bit lost in the science of all the amazing things they do for the capillaries or how they increase "microcirculation."  That's all terrific but I'm content just knowing that it's taking care of me.  I only have one body after all.

IMG_8576

It's hard to keep up with nutrition fads and trends. The information changes too often to sway with it.  What's good for you one week isn't good for you the next.  When I find foods like this that are a nutritionist's dream, I quickly incorporate them into my meals without a second thought.  Then I help myself to another guilt-free handful.

IMG_8551

Good Shepherd Cereal
Makes 10 cups

Feel free to adapt this recipe by using the nuts and dried fruits that you love. This stores well at room temperature for several weeks in an airtight container.  Great with milk or yogurt, or even as a topping for ice-cream.

3 cups organic whole rolled oats
1 cup sunflower seeds
1 cup pumpkin seeds (pepitas)
1/2 cup flax seeds
2 tablespoons chia seeds
1/2 cup wheat germ or wheat bran
1 cup sliced almonds
1 cup whole raw cashews
1 cup raw buckwheat groats
1/2 cup olive oil
1/2 cup maple syrup
1 cup currants or raisins

Combine all of the dry ingredients in a large bowl, then pour in the olive oil and maple syrup and stir to moisten all the ingredients evenly.  Spread this onto a baking sheet and bake in a preheated 250 degree oven for 1 hour, stirring every 20 minutes or so.  Remove from oven and cool, then stir in currants or raisins if using. 

Monday, January 9, 2012

Cradle of Comfort

IMG_8510

Some time during the late 1940's, my mother (3 or 4 years old) would sit in her grandmother Molly's kitchen and eat baked barley with mushrooms. Throughout her life it was one of her ultimate comfort foods. Although I hardly know a thing about my great-grandmother, I understood something about her as the rich aroma of the barley and mushrooms filled my kitchen.  Molly had given to the people in her life through small gestures like a smile, or a dish of something warming.

IMG_8502

I understood more about comfort today, eating the leftovers with a fried egg on top. Roman peered over my plate and asked for some. I told him what it was called, and his sweet little voice kept repeating "barley? barley?" so I spooned up as much as he demanded.

As I watched him eat, I found solace knowing that sustenance was being passed down to him through the hands of four different generations of women, all with the same goal.  To nurture the little bodies they created and make them grow up healthy.  And to make it taste good at the same time.
 
Ruth and my mother circa 1948

Then it all became clear.  This is who I am, thanks to the line of women who came before me.  I give and receive comfort through foods, and through the act of nurturing my family.  A warm plate of something delicious and healthy, given with a smile and a kiss on the forehead.  It's simple, really.  That's where I find the greatest sense of serenity.

IMG_8544


Baked Barley with Mushrooms
4 - 6 servings

1 onion, diced
1/2 pound mushrooms, sliced
1 cup barley
salt and pepper to taste
5 tablespoons butter
2 1/2 cups vegetable broth, boiling

In a large, deep frying pan, sauté the onion, mushrooms, barley, salt and pepper in butter.  Stir frequently until the barley is lightly browned, about 10 minutes.

Place in a casserole and stir in boiling broth.

Cover with aluminum foil and bake for approximately 1 hour at 350 degrees.

Note: After 1 hour of baking, there was still plenty of liquid, so I continued to bake, uncovered, for an additional 30 minutes until the broth had been absorbed and the texture was perfect. Check the texture of the barley after one hour.  If you need to, you can add additional boiling water if the barley is too hard.  It should be firm and slightly crunchy.

Wednesday, January 4, 2012

Beef Short Ribs and Community Supported Agriculture

Beef Short Ribs

When we lived in Italy, I had a great relationship with my local butchers.  I loved the individual attention, the sense of community in their shops and I always looked forward to visiting them for a chat. Their meats were tender and flavorful, yet I was continually curious about the origin of the meat I was buying. Despite my probing questions, it appeared impossible to get accurate information on how the meat was raised and butchered.  I imagined animals roaming the idyllic Umbrian countryside, but my fairytale still left me in the dark about the Italian meat industry.  My organic grocer sold "organically raised" meat, so I knew there was some difference between that and my butcher shop purchases.  Since no one could really answer my questions, I balanced my purchases between the butcher and the organic grocer and hoped I was avoiding hormones and antibiotics.

IMG_2034

Back in the States I certainly miss the colorful interactions with merchants in Rome.  Although I try to engage people at my local grocery store, no one has warmed up to me the way the Italians did.  So recently I've been supporting local farmers at my local Green Market who are much more open to conversation.  This winter I also joined a collective of small family ranches that offers a CSA (Community Supported Agriculture) share called 8 O'Clock Ranch.  They provide organically raised beef and lamb, as well as pastured pork and chicken. It's delicious and convenient and has the added benefit of supporting local, sustainable family businesses.

Part of the fun of a CSA share is using cuts of meat I don't normally make at home, like these beef short ribs.  I prepared them for the first meal of 2012,  using a recipe reminiscent of the hearty wild boar or ox tail I used to make in Rome.  It takes time to build community, but I'm on my way-- one sustainable purchase at a time.

Beef Short Ribs over Polenta


Slow-cook Beef Short Ribs with Polenta

Serves 4 

This makes a wonderful, hearty winter meal.  I made it a day before serving it, which was helpful because this cut of meat is rich in fat, and refrigerating it overnight made it easy to skim off 3/4 of the fat that separated, making for a less greasy sauce.  You can easily double the recipe.  If you have extra sauce once the meat has been eaten, simmer it down in a pot and serve with pasta. I have learned from experience to eat a rich meal like this for a weekend lunch instead of dinner, allowing more time for digestion. 

Olive oil
4 lbs beef short ribs (about 4 ribs)
1 onion
1 celery stalk
2 medium carrots
3 garlic cloves
1 bay leaf
1 tablespoon tomato paste
1 cup red wine
5 cups beef stock
leaves from a sprig of fresh thyme
a small handful of parsley
fresh chives 

Coat the bottom of a dutch oven or soup pot with olive oil and heat the pan to medium high heat.  Season the beef with salt and pepper.  Working in batches if needed, sear the meat for a few minutes on both sides until brown.  Remove the meat from the pot and set aside. 

Process the onion, celery, carrots and garlic in a food processor to a fine dice. 
Adding additional olive oil if necessary, sauté the vegetables in the dutch oven until transparent, about 5 minutes.  
Add the bay leaf, tomato paste, red wine, beef stock and thyme leaves.
Return the beef to the pot and cover. Simmer over medium or medium-low heat for 2 hours. 
**You can cool the dish and refrigerate overnight if you wish (skim most of the separated fat off once cooled) or serve immediately.  Remove the bay leaf and sprinkle with fresh parsley and chives before serving.  It's wonderful served with polenta.

Basic Polenta recipe
serves 4-6

6 cups water or broth
1 teaspoon salt
2 cups polenta (I like Bob's Red Mill)
1 tablespoon butter
1/4 cup grated parmesan cheese

Boil the water and salt in a heavy bottomed pot.  Add the polenta gradually and stir often while the polenta boils (this may take 20-30 minutes).  When all the water has been absorbed, stir in some butter and parmesan cheese.  Serve hot.


Related Posts Plugin for WordPress, Blogger...